Stitch and Bear

A long-running Irish blog with reviews of the best restaurants in Dublin and throughout Ireland. Some wine and cocktails thrown in for good measure!

Recent Posts

Friday, September 21, 2012

[Recipe] Orange and Almond Cake

Food is one of the great pleasures in life, but having a healthy digestive system is equally important. People who suffer from allergies, autoimmune disorders and other illnesses have to keep an eagle eye on ingredients and preparation. I've suffered with bad acid reflux, heartburn and a whole heap of other nasties for over 10 years now. Through trial and error, I've effectively eliminated wheat from my diet as well as red wine. Thanks to a recent gastroscopy, I now know that I have a hiatus hernia, and that I'm not a coeliac.

In a weird way, it's disappointing not to have a clear label for what is wrong with me. When you have a medical diagnosis, you can point to that, and not feel embarrassed about special attention. All I can say is that wheat doesn't agree with me - and you just get the feeling that people don't take it as seriously.  I've made some great progress in my attitude to wheat. I no longer crave it, and I even sometimes feel repulsed by it. It's as if my body knows that the wheat is going to cause some hurt. 

As someone who loves to bake, the removal of wheat is a challenge. For a while, I just stopped baking altogether. But the recent Great Irish Bake Off challenge woke me back up, and particularly the episode where the contestants had to bake a torte with non-wheat flour. Almond flour is a classic alternative to wheat flour, and on a recent visit to the Tannery Cookery School, chef Paul Flynn shared a recipe for Sicilian Almond Cake. It's delicious, sticky, moist and a multitude of other good things. The original recipe calls for stale white breadcrumbs, which I just omitted while baking. Enjoy!
Orange and Almond Cake


Orange and Almond Cake

50g stale white breadcrumbs
200g caster sugar
100g ground almonds
1 1/2 level teaspoons baking powder
200mls sunflower oil
4 eggs
Zest of one lemon, finely grated
Zest of one lime, finely grated

Start by lining the base of an 8" baking tin with a round of greaseproof paper. Grease and flour (I used the ground almonds) the sides of the tin.

Mix the breadcrumbs (I left these out) with the sugar, almonds and baking powder. Whisk the oil with the eggs, pour into the dry ingredients and mix well. Add the orange and lemon zest.

Pour the mixture into the prepared tin and place into a cold oven. Turn the oven to 180C and bake for 45 - 60 mins until the cake is golden brown and a skewer comes out clean. (Apparently, placing the cake into a preheated oven would cause a soufflé effect, along with subsequent deflation).

Allow the cake to cool for 5 minutes before turning out onto a plate.
Letting the syrup soak in
Syrup

The addition of a zingy, spiced syrup makes this cake incredibly moist and sticky.

Juice of one orange
Juice of one lime
75g sugar
2 cloves
1 cinnamon stick

Put all the ingredients into a stainless steel saucepan. Bring gently to the boil, stirring until the sugar has dissolved completely, then simmer for three minutes. While the cake is still warm, pierce it with a skewer, and spoon the hot syrup over the cake. Leave to cool. Spoon the excess syrup over the cake every now and then until it is all soaked up.

Serve with softly whipped cream or some Greek yogurt.
A slice of deliciousness

Share:

Sunday, September 9, 2012

Great Irish Bake Off - Week 4 - Crème Caramel

Last Tuesday was Week 4 of the Great British Bake Off, where we saw the contestants' creativity tested with the design of a large flourless torte, followed later by a creative layered meringue cake. The surprise technical challenge was a classic crème caramel, chosen by Mary Berry for it's precise requirements. For us Irish bakers, the Great Irish Bake Off continued in parallel, with a choice between the crème caramel and layered meringue cake. 

I really wanted to tackle both challenges and I had even spent my latest drive between Cork and Dublin thinking about flavours for the meringue cake. But time makes fools of us all, and I had to choose. Given that I had recently received 2 lovely sets of vanilla pods as a prize from Goodall's Ireland, and the simple fact that I love custard, I chose to make crème caramel.
My prep board - eggs, vanilla pod and my new ceramic knife
I started by reading the recipe, very carefully. This recipe involves making a sugar syrup and boiling it until it turns to caramel. I have a respectful wariness of sugar work, so I wanted to get this one right. One thing I do know is that you should use a clean, smooth saucepan. Unfortunately, most of my cookware is cast iron, so I had to dig out the small egg pan. I added the sugar and water and placed on a low heat, stirring occasionally until all the grains had dissolved and I could no longer feel any grittiness. 

In the meantime, I preheated the oven and placed my ramekins in there to warm through. Once the syrup was ready, I turned up the heat and watched it keenly. You're not really supposed to stir the caramel, so I had to make do with gentle swirls of the saucepan. It seemed to take forever, but eventually the syrup started to turn from clear to gently golden. It then progressed very quickly to the desired copper colour, at which point I pulled it off the heat and poured a generous layer into the base of my ramekins. 
The dangerous part - making the caramel
First hurdle complete - caramel in the ramekins
I left the caramel to set and turned my attention to making the custard. I took out one of my new vanilla beans and split it down the middle. I added the seeds to my egg and sugar mixture, while the empty pods were added to my milk. The milk must be heated until it's just about too hot to dip a finger into. At this point, I poured a tiny amount into the egg mix and beat well (If you add too much hot milk too fast, you will scramble your eggs). Once the egg mixture was tempered, I was able to pick up the pace and mix in the rest, bit by bit. 

A good layer of butter is required on the ramekins, followed by pouring in the custard (through a sieve to catch all the vanilla pod bits). The ramekins were placed in a deep dish, which I placed in the oven, and then partially filled with boiling water, creating a bain-marie. This helps the custard cook evenly and gently.  The BBC recipe calls for 20-30 minutes baking time, so I dutifully checked after 23 minutes! Some of my ramekins had picked up a little colour, while the others were wobbly. I decided to trust my instincts and take them out of the oven to cool.
After the bake - cooling down
Once cooled, the creme caramels were transferred to the fridge to chill and allow the caramel layer to dissolve around the custard. To free the cremes, I ran a knife around the inside of the ramekin, and then placed a plate of top. A quick prayer and a little shove, and the creme plopped out surrounded by a lovely puddle of rich coloured caramel. This was of course followed by a rebel yell of delight from myself!
Turned out - successfully!!
A cutaway shot for the #GIrishBO judges
After a few photographs, we settled down on the sofa to eat the fruits of my labour. I was amazed at the texture of the creme, which was silky smooth and as good as anything I've eaten in a fine restaurant. The rich, slightly dark flavour of the caramel was beautifully balanced by the smooth coolness of the creme.

I'm delighted that I chose to make this classic French dessert. Taking part in the Great Irish Bake Off has challenged me to tackle something new, and the results have been impressive. Here's hoping for some more interesting challenges from the #GIrishBO crew!
Share:

Monday, September 3, 2012

Great Irish Bake Off - Week 3 - Tarte Tatin

The Great British Bake Off is back on BBC and I have my UPC box set to record. I've loved this programme since it first appeared on our googlieboxes, but this year it's even better thanks to Caítriíona from the blog Wholesome Ireland. She had the bright idea of running a parallel competition whereby Irish baking fans tackle the same challenge as the contestants. The competition is called the Great Irish Bakeoff and you can follow the discussion via the #GIrishBO hashtag on Twitter.

This weeks challenge was either a Treacle Tart (the technical challenge) or a classic apple Tarte Tatin. I was going to be at home over the weekend, so I decided to bake the latter. Once I got back home (after two weeks away for work), I went straight to my Michel Roux books, where I found his recipe for Tarte Tatin.

Roux's recipe is actually quite a good bit easier to follow than the methods I saw on Episode 3. Each contestant made their syrup or caramel separately, even leading to 7 ruined syrups in the case of one contestant. Roux's recipe is really more of a "one-pot" technique, easier to execute but the results are superb. 

You can either make your own rough-puff pastry (relatively easy actually), or purchase a good quality ready to roll puff pasty. Roux's recipe calls for 5 apples, but I ended up requiring only 3 (and I was packing in the slices at that).

Classic Apple Tarte Tatin

Rough puff pastry, or ready to roll puff pastry
120g butter, softened
160g castor sugar
3-5 apples, peeled, cored and sliced

Take a 23cm/9 inch cake tin or pie dish - the key thing is that is has to be sealed and able to sit on a cooker top. Take the butter and spread it out evenly in a thick layer in the tin. Pour the sugar on top and make sure it is distributed equally. 

Arrange the apple slices in a neat pattern on top of the butter and sugar layer. I started with a rosette in the centre of the tin, and then filled in the outer ring with more slices. Take the chilled pastry and roll out until it more than covers the cake tin. Lay the pastry carefully on top and trip around the edge, leaving about 1cm overhang. Cover the tin and place in the refrigerator to chill for at least 20 mins.

Preheat your oven to 180 C and turn a cooker ring to a medium heat. Remove the tin from the fridge, uncover and place on top of the cooker ring. After a while the butter will melt and a caramel will start to form. You can use a knife to carefully lift up the pastry lid to keep an eye on the caramel. After about 10 mins, roll up the pastry edges to form a seal on the tin, making sure to prick plenty of holes in the pastry lid and transfer to the oven. Bake for about 25 mins, or until the lid is golden brown.
Just out of the oven - look at all that caramel
I used a Pyrex baking dish to hold my tarte tatin, which turned out to be a great decision as it meant that I could see the apple slices and caramel in action. When I took the tarte out of the oven, it looked like I had too much caramel, but I decided to hold faith in the recipe.

I left the tarte to cool for about 5-10 minutes before I inverted it onto a serving plate. Sugar and caramels get incredibly hot when cooking so take great care when inverting the tarte. I placed a large flat plate over the pastry and quickly flipped the dish over. Thankfully, all my fruit came out without sticking and I ended up with a near perfect execution. My careful rolling of the pastry lid had paid off, as it had formed a natural lip on the tarte, holding the caramel from spilling out.
Tarte Tatin turned out - with no disasters
Roux recommends serving the tarte straightaway, but I have learned to be wary of hot caramel, so I left the tarte sit and rest while we ate our dinner. Once we were ready, I carefully cut some slices, taking great pleasure in watching the delicious apple-caramel oozing out. I've also included a shot of the underneath of the tarte, just to prove that I didn't suffer from the dreaded "soggy bottoms".
A slice of delicious Tarte Tatin
No soggy bottom here - just lovely flakiness and caramel
So there you have it, a classic French Tarte Tatin, made according to the recipe of one of the great modern French chefs. That might make it sound intimidating, but it's quite easy to make, and there is little risk of ruining your saucepans with burnt caramels :)


Share:

Thursday, April 19, 2012

Do your cakes have the Cake Factor?


In just a single day, I received news of two great events, both of which deserve to be supported. First up were a group of 3rd culinary students from DIT who are holding an Eat Only Irish night on May 2nd and will charge a mere €20 per head for an eight course tasting menu. More details here.

The second event comes courtesy of the Emerald Warriors (EWRFC), Ireland's gay rugby club, who will hold their 5th annual fundraising 'Tea Dance' and 'Bake Off'. Entertainment is guaranteed with Shirley Temple Bar, Veda Beaux Reves and Davina Devine hosting the event in The George Bar and Nightclub on Sunday, April 29th, between 3pm-6pm.


Shirley Temple Bar does her Tea Dance
These fabulous ladies will don their pinnies, twin sets and pearls in order to serve up a delicious selection of home baked treats on dainty dollies. Guests will also enjoy a variety of entertainment in the form of a Make & Do Corner, a ‘Bake Off’ and old style ceili dancing all washed down with lashings of tea.

As part of the event the club is calling on amateur bakers to don their aprons for the annual ‘Bake Off’ competition. Contestants are invited to offer up a tasty baked treat which will be served on the day and judged by The George’s drag queens in a Cake Factor meets X-Factor style competition. Contestants will have to present their cakes to the judging panel who will determine if their offerings are worthy of the cake table. A selection of prizes are up for grabs for the best and worst cakes.

A fun day out for all ages, tickets for the event are priced at €10 and are available directly from The George bar or they can be booked online be emailing The Emerald Warriors Club events@ewrfc.ie   All funds raised will go to supporting the Emerald Warriors Rugby Club.

For more information on the event visit www.thegeorge.ie or  www.ewrfc.ie 
Follow the action on Twitter @Thegeorgebar or @ewrfc 

Share:

Friday, October 28, 2011

Melting Moments Biscuits

Everyone needs a party piece when it comes to baking. It should be something that you can make quickly with a minimum of fuss and ingredients, but delivers maximum impact. When I saw Mary-Anne Boermans bake some tiny, dainty biscuits on BBC's The Great British Bake Off, I was intrigued. She used a minimum of ingredients, 5 to be exact, but the judges oohed and aahed over the results.

I found Mary-Anne's recipe on her blog, Time to Cook - Online, and the more I read, the more I liked. The biscuits are super adaptable, delicious served plain, but also capable of being dolled up with buttercream or filling of your choice. They go especially well with coffee.

Stitch and Bear - Delicious Melting Moments
My version of Mary-Anne's Melting Moments

Ingredients
250g unsalted butter, room temperature
58g icing sugar
1 teaspoon vanilla essence
250g plain flour
58g cornflour

Preheat your oven to 180 Celsius for fan-assisted ovens, or 200 Celsius for conventional ovens. Line two baking sheets with greaseproof paper.

In a bowl, beat the butter for several minutes until pale and creamy. Sift the icing sugar into the bowl and continue to beat for another minute or two until well incorporated. It is worth having the butter as soft as possible before starting as this is the main source of liquid in the recipe. The softer the butter is, the easier it will be to pipe the biscuits.

Add the vanilla essence and quickly beat in. 

Sift the flour and cornflour into the bowl and beat well until mixed in. Use a spatula to scrape down the sides of the bowl to ensure that all dry ingredients are incorporated into the mixture. 

Once ready, fit a wide star nozzle to a strong piping bag (preferably canvas) and fill with the mixture. Pipe evenly onto the baking sheets. Placing a template guide under the greaseproof paper will help you produce even results. Depending on your piping skill level, you can pipe swirls or simple stars, as in my photo above. 

Mary-Anne recommends placing the baking sheets in the freezer for 15 minutes to firm the mixture before baking, but I don't have the freezer space to do this, and my biscuits have turned out pretty good without. Place into the oven and bake for approx 12 minutes, or until lightly golden. 

Remove from the oven and leave on the tray for a few minutes to harden. They are too delicate to move while still hot from the oven. Once cool, transfer gently with a palette knife to a wire rack to cool completely.

Enjoy on their own, or sandwich together with fillings such as jam, buttercream, chocolate or caramel. Only your imagination will limit you.

Stitch and Bear - Melting Moments sandwiched with chocolate buttercream
Melting Moments sandwiched with chocolate buttercream

Share:

Tuesday, October 25, 2011

CheapEats.ie Cake Sale in aid of Barnardos

If you're a keen baker, and fancy helping out a worthy cause this October Bank Holiday Weekend, while also getting to eat some goodies from other bakers, then read on.

Childhood charity Barnardos are running a week long fundraising effor in conjunction with RTÉ 2fm. The Dress Up for Barnardos week involves getting dressed up for Halloween while raising some much needed money. It's really easy to take part and all contributions will go to a good cause. 

The good folk at CheapEats.ie are organising a cake sale this Saturday, October 29th with all proceeds going to Barnardos. In order to gather foodstuffs for the sale, they are calling on all Irish food bloggers and keen bakers to get working in the kitchen to create some tasty treats for donation to the sale. If you would like to bake something for this, please email jean@cheapeats.ie so they know of your participation, and so that you can receive some top tips.

The cake sale will take place Saturday afternoon in the Grand Social bar, on Liffey Street, alongside the Hapenny Flea Market with all the stallholders dressing up for Halloween. Donations will be accepted between 11.30 and 12.00 on Saturday, but get in touch with Jean to organise an alternative time, if required.
Share:

Sunday, June 19, 2011

Ginger Biscuits

I used to view shop-bought Ginger Nut biscuits with a lot of trepidation when I was young. The sight of a Ginger Nut biscuit was something that made you assess the state of your teeth and general dental health. It was a continuous game of mental chicken. More often than not, I backed out, utterly convinced that biting into a dry Ginger Nut would mean losing all my teeth. So instead, I would resort to a cup of tea and some dunking.

All throughout my childhood, I remember my mother using tonnes of ginger in her baking, so it wasn't a surprise when I visited home recently and found that she had turned her hand to making ginger biscuits. Depending on how long these spend in the oven, it is possible to have soft-chewy biscuits, or alternatively, the more traditional, crunchy ginger biscuit.


The following ingredients will make about 24 biscuits. Preheat your oven to 180 Celsius and line some baking trays with greaseproof/baking paper.

Ingredients
175g plain flour
2 level teaspoons ginger powder
2 level teaspoons baking soda
75g sugar
90ml golden syrup
75g buter

First of all, you will need to gently warm the golden syrup. You could do this in a saucepan over a gentle heat, but I prefer to measure the golden syrup in a pyrex jug and then place the jug in the oven until the syrup has thinned and has pouring consistency.

Meanwhile, sieve the dry ingredients into a bowl and stir in the sugar. Rub in the butter until the mixture resembles breadcrumbs. Once the syrup is ready, pour it into the dry ingredients and mix well. A dough should form easily and you will end up with a smooth, glossy paste.

Using your hands, form small balls (think a large cherry tomato) and arrange well apart on your baking sheets. You can make larger shapes, if you like, which will give you more substantial and chewy cookies. Place the sheets in the oven and bake for 
(a) 10-15 mins or until lightly golden, if you want to maintain chewiness or
(b) 15-20 mins or until dark golden, if you want a more traditional cruncy biscuit.

Take out of the oven and leave to cool on the tray. Once the biscuits have solidified and are cool, transfer to a wire rack to cool completely.
Share:

Saturday, June 11, 2011

Apple Crumble Cake

A while back, I posted my recipe for Apple & Oatmeal biscuits. When buying the apples to make those cookies, I ended up purchasing a large bag of Granny Smith's, so even after making the cookies, I still had apples coming out my backside. Therefore I decided to make an apple crumble cake. This a bit of a mixed bag, a bit like a crumble but with a light sponge-like base. The addition of a little cinnamon to the crumble gives it a little lift.You can pile it up with apples, resulting in a juicy, moist cake that goes lovely with a dollop of cream or scoop of ice-cream. (The photo below shows a slice of cake with the delicious vanilla ice-cream from Green & Blacks.)


For the sponge base
60g butter
100g caster sugar
1 large egg
1/2 teaspoon vanilla essence
140g plain flour
1 teaspsoon baking powder
pinch of salt
80ml milk
3 Granny Smith apples

For the crumble
70g plain flour
1/2 teaspoon ground cinnamon
40g butter, chilled and diced
70g soft light brown sugar

Pre-heat your oven to 170 degrees Celsius, then grease and flour a 20cm springform cake tin.

Start by making the crumble topping. Sif the flour and cinnamon together, then, using your fingertips, rub in the butter until you reach the famous "breadcrumb" stage. Mix in the sugar and set aside.

The next step is to make the sponge. Cream together the butter and sugar until plae in colour and fluffy. Add the egg and vanilla essence and mix well, making sure that all ingredients are incorporated. Sift together the flour, baking powder and salt and add half this mixture to the butter and sugar along with half the milk. Mix well and then repeat with the other half. Once everything is well mixed, pour the batter into the prepared cake tin.

Peel, core and slice the apples and arrange them in circles on top of the batter. Be generous here, as the more apple you use, the moister and juicier the resulting cake will be. Finally, sprinkle the crumble topping on the apple slices, making sure to form an even layer.

Bake for about 35-45 minutes, or until the topping is golden brown, and skewer comes out clean from the middle of the cake. Set aside to cool in the tin and then remove. Serve with some ice-cream while still gently warm, or else perhaps some custard or cream.
Share:

Wednesday, May 11, 2011

Pea, Ham & Feta Muffins

I woke up last Saturday without much of a hangover. I was a bit surprised by this to be honest as I had drank a *few* glasses of wine on the Friday night (including a lovely Pouilly-Fumé at Ely Wine Bar.  Anyhow, after a relaxing little lie-in, I decided to make a quick batch of pea, ham & feta muffins to have for breakfast. These can be whipped up really quickly, and are delicious when slightly warm. Like most baking, the flavour improves and intensifies if they are left to sit for a day.

Feel free to play with the ingredients to come up with your own variety of muffin. I like to use smoked ham to add flavour, and I have a feeling that a little chilli wouldn't go astray. These make a great breakfast or a snack on the go.


 Preheat your oven to 190 degrees Celsius and linke a deep hole muffin tin with cases. This recipe will make approximately 10-12 muffins. Although the recipe given references a traditional muffin tin and cases, I actually used a silicone muffin tray, meaning that I didn't need to use muffin cases.

Ingredients
300g plain flour
1 tablespoon baking powder
1/2 teaspoon bread soda
1/8 teaspoon salt
2 large eggs
250ml whole milk
85g butter, melted
40g peas fresh, or defrosted from frozen
60g sliced ham, diced (I like smoked ham)
40g feta cheese

Sift together the flour, baking powder, bread soda and salt into a large bowl. Break the eggs into a jug, add the milk and beat well.

Form a well in the middle of the dry ingredients, pour in the milk & eggs, and mix until the ingredients come together. Add the melted butter and continue to mix. Make sure to scrape down the side of the bowl to incorporate all ingredients. 

When the batter is smooth, add the peas and ham and crumble in the feta. Stir together by hand, making sure that they are evenly dispersed. Spoon the mixture into the muffin cases, filling until about 2/3 full. Bake for 25-30 mins or until golden and springy to touch. Allow to cool in the tray for a few minutes, and then transfer to a wire rack.


Share:

Thursday, May 5, 2011

Apple & Oatmeal Cookies


These apple & oatmeal cookies are a fantastic variation on the more classic oatmeal cookie.The use of two types of sugar keeps the cookies light but still golden, while the use of cinnamon and crispy and sweet Granny Smith apples lends a delicious background flavour. Depending on how long you leave them in the oven, you can end up with lightly golden, cake-like cookies, or else crisp and crunchy. The choice is yours.

Chocolate drizzle on top is optional! This recipe makes about 10-12 cookies.

Ingredients
135g butter, softened
80g castor sugar
80g light brown sugar
1 large egg, beaten
1/2 teasp vanilla essence
190g plain flour
1/2 teaspoon salt
1/4 teaspoon ground cinnamon
1/2 teaspoon baking soda
2 Granny Smith apples
60g rolled oats

Preheat oven to 170 Celsius and prepare a baking sheet.

Cream the butter and two types of sugar together, until light and fluffy. As always, the more time you spend on this, the better the end result will be.Add the egg and vanilla essence and beat well until incorporated. 

Sift together the flour, salt, cinnamon & baking soda and mix into the batter in two stages. At this stage a light dough should have formed.

Now for the good stuff. Peel and finely grate the apples. Squeeze all the liquid from the apple pulp and add the apple pulp to the dough, along with the rolled oats. Stir in by hand.

Using a spoon (I think a dessertspoon gives the best results), place rounded measures (or balls) of the dough on the banking sheets, making sure to leave plenty of space for expansion while cooking. 

Bake in the oven for about 15-20 minutes, depending on the desired end result. Remove from the oven and leave to cool on the tray for about 10 minutes, before tranferring to a wire rack to cool completely.
Share:

Saturday, April 30, 2011

Black & White Chocolate Cheesecake Squares

I've been reading a lot of cookbooks lately, some for the first time and others for the umpteenth time. The new Cake Days cookbook from the lovely Hummingbird Bakery has already become a firm favourite, despite being one of the new additions. So far, all the recipes have been a success at first try, and the cakes I've tried have been nothing short of delicious and indulgent.

The latest recipe I've tried was so successful (and scrumptious) that I have to share it. It takes a little effort as two rounds of baking are required, with some cooling time in between, but the results are a very adult, very rich snack. The mix of a dark cocoa base and a tangy, white chocolate cheesecake is a great combination.


Firstly, you need to make the dough for the dark chocolate base. For this, you will need to line a 23 x 30 cm baking tray with parchment. (Try to get a tin that is at least 2-3 cm deep). When I first made this, I thought the ingredient quantities seemed huge, but it does work.

For the base
250g butter (softened)
420g castor sugar
2 eggs (beaten)
380g plain flour
60g cocoa powder
1 teaspoon bread soda (bicarbonate of soda)
1/2 teaspoon salt

Cream the butter and sugar until light and fluffy. It really pays to have the butter as soft as possible. It's not really possible to overwork the butter and sugar, so make sure to spend some time on the creaming, getting it as smooth and light as possible. 

Add the eggs one a time, beating well between each addition, making sure to occasionally run a spatula down the sides of the bowl to incorporate the ingredients.

Sift together the remaining ingredients, then add to the batter in two batches, beating well with each addition. At this stage you should have a stiff, sugary dough. Cut off one quarter of the dough, wrap it in clingfilm and pop it into the fridge to rest for a while. 

Press the remainder of the dough into the baking tray, cover and leave to chill in the fridge for 20 - 30 mins. In order to get a smooth base, I spooned the mixture into the tin, covered it loosely with clingfilm and then pressed out the dough through the clingfilm. I then used a small spice container like a rolling pin to make sure that I got a smooth even finish.

At this stage, preheat your oven to 170 Celsius. Once ready, bake the base for 20-25 mins. Cool it completely in the tin before you move to the next stage of adding the cheesecake. However, it's best to leave the oven on as you will be baking the cheesecake.

For the cheesecake
80g good quality white chocolate
300g full fat cream cheese
60g icing sugar
1 large egg, beaten

Melt the chocolate in a glass bowl over a saucepan of boiling water. Once melted, take off the heat and leave to cool slightly. In the meantime, mix the cream cheese and icing sugar until smooth. Add the egg, mixing well. Finally, mix in the melted chocolate.

Pour the mixture over the dark chocolate base. Lastly, take the chilled dough from the fridge and tear off lumps. Drop the lumps randomly into the cheesecake mixture. As the dough cooks, they will expand slightly and provide a nice contrast.

Bake the completed dish for about 25 mins, or until the cheesecake has set. Allow to cool completely, then place in the fridge for a few hours before serving. Once the cake is fullt set, cut into squares or bars with a very sharp clean knife (the cheesecake mixture will crumb slightly, so a sharp knife helps). Finally, enjoy!


Share:

Monday, April 18, 2011

Chocolate & Dungarvan Stout Cake

Stout has always been something that I've both liked and disliked. I can remember my grandmother giving me a glass of Guinness (from the bottles which were kept under the kitchen sink) when I was little and poorly. She said that it would help me feel better and make me stronger. We all know now that stout is full of B vitamins and iron, but all I knew then was that it tasted vile (flat & warm) and I threw it down the bathroom sink as soon as she was gone.

Given that this was the same grandmother who used to put whiskey in my bottles when I was a baby to help me sleep, I actually think I've done pretty well to only be a moderate drinker.

I also remember her making porter cakes, which were rich with fruits soaked in stout for hours before baking in thick, heavy cakes that were delicious when smothered in butter. Yes, it's fair to say that my granny was pretty handy with alcohol. 

I came across the following recipe when reading the Hummingbird Bakery Cake Days cookbook. The mention of a chocolate and stout cake imediately reminded me of Nana, but I'd doubt that she have much faith in this recipe given that it features lots of chocolate and not a lot of dried fruit and glace cherries. (She was rather big on the dried fruits). However, when making this cake, I decided to abandon the traditional Guinness and instead use a newer alternative - Dungarvan Brewing Company Black Rock Stout.

The result is a magnificently moist and rich chocolate cake, that has a lovely stout flavour to cut through the sweetness. It keeps well and as with most cakes, the flavour improves with age.

Chocolate & Stout Cake
Chocolate & Dungarvan Stout Cake
Ingredients
250 ml Dungarvan Black Rock stout
250g butter
400g castor sugar
80g cocoa powder
140 ml buttermilk
1 teaspoon vanilla essence
2 eggs
280g plain flour
2 teaspoons bread soda
1 teaspoon baking powder

Method
Preheat the oven to 170 C and line the base of a 23cm diameter spring-form cake tin. Alternatively you can use an equivalent silicone bakeware dish, which requires no lining or greasing. Place the tin on  flat baking tray which will make it easier to get in and out of the oven.

Gently heat the stout and butter together in a saucepan over a low heat , stirring frequently until the butter is melted. Remove from the heat and add the sugar and cocoa to the stout. Mix until the sugar and cocoa has melted into the stout, leaving you with a dark, sweet liquid.

In a bowl or jug, mix together the milk, eggs and vanilla essence, then add to the stout mixture. At this point it will look like a lot of liquid, but the cake will be all the moister because of this.

In a large bowl, sift together the flour and raising agents. While beating slowly, gradually add the stout & chocolate mixture, ensuring that all ingredients are well combined.

The cake batter
Pour the batter into the baking tin. Gently transfer to the oven and cook for approximately 45 mins, or until the top of the cake springs back when gently pressed and a skewer inserted into the middle of the cake comes out clean and free of crumbs. Resist the temptation to open the oven and check on the cake until close to the end of the cooking time. This is a very liquid cake and you don't want it to collapse or sink inwards in the oven. 

Once you're satisified that the cake is ready, remove it from the oven and transfer the baking tin to a wire rack. Leave the cake to cool in the tin until cool enough to release from the tin. To remove the cake from the tin, run a butter knife around the inside of the tin to loosen the cake, then place a large plate on top and turn the tin upsaide down. Place another large plate on the cake and flip over to the right way up. Leave the cake to cool thoroughly.

My favourite way to serve this cake is with a chocolate buttermilk frosting, which is so easy to make, and uses some more of the buttermilk that you bought to put in the cake. It's best to ice the cake the day before as this will give the icing some time to crust and set, although it will remain quite soft to the touch.

Ingredients
500g icing sugar
2 tablespoons cocoa powder
150g butter, softened
50 ml buttermilk

Method
Sieve the icing sugar and cocoa powder into a large bowl. Create a well in the middle of the bowl. Add the butter and a spash of the buttermilk to the well and gradually start to mix the butter with the icing sugar, working from the inside of the well outwards. Add more milk as the mixture becomes dry. Beat until all the icing sugar has been mixed in and the icing is soft and fluffy. 

Carefully apply the icing to the top and sides of the cake with a butter knife, or spatula knife. Dust with some more cocoa powder if preferred. It's best to leave the icing sit for a while  (or overnight) to allow it to crust slightly before serving.
Share:

Monday, April 4, 2011

Whoopie Pies

Fancy some chocolately goodness? How about a bite-sized cake made up of two halves filled with a buttery oozing filling? If that sounds good to you, then I'd like to introduce you to the Whoopie Pie. (I first came across these little beauties on Donal Skehan's Good Mood Food Blog). Originally made as a dessert for the working men of New England, they can be a rather fantastic little dessert or party snack. The cakes bake with a lovely soft crusty and are deliciously sweet and rich.

Preheat your oven to 180 Celsuius and line some baking trays. For the cakes you will need the following ingredients. This will make about 16 cakes.

120g butter
190g sugar
2 eggs, beaten
270g plain flour
5 tablespoons cocoa powder (good quality!)
1 teaspoon baking powder
1/2 teaspoon salt
1 teaspoon vanilla extract
250ml of milk (or buttermilk for extra richness)

Cream the butter and sugar until light and fluffy. In another bowl, sift together all the dry ingredients. Slowly add the eggs, vanilla extract and some of the dry ingredients to the eggs in order to bring the mixture together. Continue to add the flour along with the milk. The end result whould be a thick, rich batter, which has a smooth creamy texture.

Place nice rounded spoonfuls of the mixture (think small dessertspoon) on the baking trays, making sure to leave plenty of room between, as these little bad boys will expand in the oven. Bake in the oven for 15 mins, or until springy to touch. Remove from the oven and leave to cool in the tray. Transfer carefully to a wire rack to cool fully.


While the cakes are cooling, it's time to make the buttery filling. It's pretty easy - just mix the following ingredients together until smooth.

250g icing sugar
170g butter
2 egg whites
1 teaspoon vanilla extract
Pinch of salt

Once the cakes are cool, select two evenly sized halves, and sandwich together with a generous dollop of the filling. I didn't use too much in mine, as I don't want it to ooze all the way out. However, feel free to layer in as much filling as you want! Finally, the best part - enjoy!


Share:

Sunday, April 3, 2011

Butter Biscuits

I had to bake something today, but when I looked in the fridge, I realised that I had no milk or eggs. Being too lazy to head to the shop, this lack of ingredients limited my baking options, so I decided to make some butter biscuits. These are a simple biscuit to make, yet they're the equivalent of any shop-bought shortbread I've ever had.


Preheat the oven to 160 degrees Celsius and line some baking trays with parchment.

240 g butter, cubed
150g castor sugar (although I used a mix of brown and castor sugar)
360g plain flour

Use a food processor to mix all ingredients to a crumbly dough. Turn out onto a lightly floured surface and knead the dough to bring it together. I split my dough into two parts, keeping one half plain, and adding chocolate chunks to the other half.

Flatten out the mixture to about 5mm thick and cut into desired shapes. Transfer onto the baking trays and bake for at least 10 mins before checking. You may need to cook for another 5-10 mins depending on size, but the biscuits should be taken out when lightly golden. Leave to cook on the tray for 5 mins before transferring to a wire rack to cool completely. To really bring these biscuits into the luxury zone, melt some chocolate and half dip each biscuit into the chocolate.

Share:

Sunday, March 27, 2011

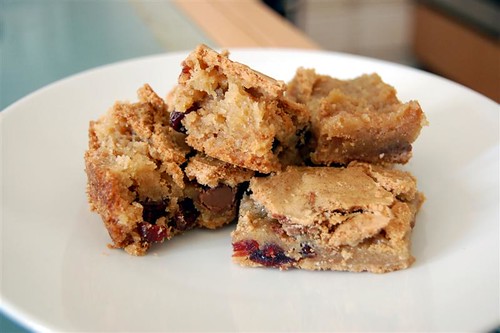
[Recipe] Chocolate & Cranberry Blondies

Chocolate & Cranberry Blondies
I wanted to make something sweet, and thanks to inspiration from the Fuzzy Times blog, I chose to make Blondies. These are chewy, fudgy biscuits, which are infinitely adaptable. Based on the contents of my cupboard, I ended up making mine with Terry's Chocolate Orange and dried cranberries. One of the major bonuses of this recipe is that it can be all done in a single bowl - so minimal washing up required.

Preheat your oven to 180 Celsius and well grease an 8"x8" baking tin.
  • 100g butter
  • 220g light brown sugar
  • 1 egg, beaten
  • 1 teaspoon vanilla essence
  • pinch of salt
  • 140g plain flour, sifted
  • 1 cup of ingredients (chopped nuts, chocolate chunks, fruit etc)
Melt the butter (I melted mine in the bowl, over a pan of boiling water), then mix very well with the sugar until smoothly combined. Mix in the egg and vanilla essence. Mix in the flour and salt, followed by your choice of flavoursome ingredients. Pour into the tin, smooth and bake in the over for 20 - 25 minutes until set. Don't let the mixture overcook - you want the middle to stay gooey. Leave to cool in the tin and turn out on a wire rack.
Share:

Thursday, March 5, 2009

Gluten-Free Lemon Ricotta Cookies

My cooking urge and sweet tooth got the better of me again yesterday when I stumbled across the link to these delicious sounding Lemon Ricotta Cookies.

I decided to make them gluten-free by substituting ground almonds for the flour, but I made one classic mistake. As this is an american recipe, and therefore measured in cups, I substituted one cup of almonds for the cup of flour. Bugger. I should have used more almonds, or maybe a little gluten-free flour, as the cookies simply melted into one big sheet in the oven

Still though, they tasted damn good, so the recipe has huge potential. Here's the original and once I get the proportions right with almonds, I'll post that up too.

cup (2 sticks) unsalted butter, softened
2 cups granulated sugar
2 large eggs
15 oz. whole milk ricotta cheese
3 Tbsp. Meyer lemon zest, freshly grated*
1 Tbsp. Meyer lemon juice
2 1/2 cups all-purpose flour
1 tsp. baking powder
1 tsp. salt

Cream the butter and sugar until light and fluffy. Add the ricotta, lemon juice, lemon zest and eggs and mix well. Slowly incorporate the dry ingredients until mixed through. Drop spoonfuls onto a lined, preheated baking sheet. Bake in a 350 F oven until the cookies are light golden. Let them cool on the sheet for a few minutes and then transfer to a wire rack.
Share:

Wednesday, February 18, 2009

Gluten-Free Chocolate Brownies

I had a craving to do some baking while sitting at work today, so I decided to make a batch of chocolate brownies. I had some dark Moser Roth chocolate (from Aldi) in the cupboard at home, along with ground almonds, so I knew that I'd have no problems making them.

I particularly like this Moser Roth chocolate. Thanks to Aldi, it's great value and there is a fantastic orange and almond variety that I'm becoming very partial to. I'd recommend getting chocolate with a high cocoa content as there is enough sugar already in this recipe.

75g dark chocolate
100g butter
200g castor sugar
75g ground almonds
2 eggs, beaten
1 tsp baking powder (gluten-free variety)
1-2 tsp vanilla essence
pinch of salt
coarsely chopped walnuts

Melt the chocolate in a bowl over some hot water. Cream the butter and sugar together and gradually incorporate the beaten eggs. While beating, slowly add the melted chocolate and vanilla essence. Mix in the almonds, salt, baking powder and walnuts. Pour into a lined and greased baking tin and bake at 180 degrees Celsius for about 30-35 minutes. Leave to cool in the tin and turn out when still a little warm.
Share:
© Stitch and Bear | All rights reserved.
Blogger Template Developed by pipdig